2013年3月12日 星期二

Linux partition scheme

http://docs.fedoraproject.org/en-US/Fedora/15/html/Installation_Guide/s2-diskpartrecommend-x86.html#sn-partitioning-advice


8.16.5. Recommended Partitioning Scheme

8.16.5.1. x86, AMD64, and Intel 64 systems

Unless you have a reason for doing otherwise, we recommend that you create the following partitions for x86, AMD64, and Intel 64 systems:
  • A swap partition
  • A /boot partition
  • A / partition
  • A swap partition (at least 256 MB) — swap partitions are used to support virtual memory. In other words, data is written to a swap partition when there is not enough RAM to store the data your system is processing.
    In years past, the recommended amount of swap space increased linearly with the amount of RAM in the system. But because the amount of memory in modern systems has increased into the hundreds of gigabytes, it is now recognized that the amount of swap space that a system needs is a function of the memory workload running on that system. However, given that swap space is usually designated at install time, and that it can be difficult to determine beforehand the memory workload of a system, we recommend determining system swap using the following table.
    Table 8.3. Recommended System Swap Space
    Amount of RAM in the System Recommended Amount of Swap Space
    4GB of RAM or less a minimum of 2GB of swap space
    4GB to 16GB of RAM a minimum of 4GB of swap space
    16GB to 64GB of RAM a minimum of 8GB of swap space
    64GB to 256GB of RAM a minimum of 16GB of swap space
    256GB to 512GB of RAM a minimum of 32GB of swap space

    Note that you can obtain better performance by distributing swap space over multiple storage devices, particularly on systems with fast drives, controllers, and interfaces.
  • A /boot/ partition (250 MB)
    The partition mounted on /boot/ contains the operating system kernel (which allows your system to boot Fedora), along with files used during the bootstrap process. For most users, a 250 MB boot partition is sufficient.

    Important — Supported file systems

    The GRUB bootloader in Fedora 15 supports only the ext2, ext3, and ext4 (recommended) file systems. You cannot use any other file system for /boot, such as Btrfs, XFS, or VFAT.

    Note

    If your hard drive is more than 1024 cylinders (and your system was manufactured more than two years ago), you may need to create a /boot/ partition if you want the / (root) partition to use all of the remaining space on your hard drive.

    Note

    If you have a RAID card, be aware that some BIOSes do not support booting from the RAID card. In cases such as these, the /boot/ partition must be created on a partition outside of the RAID array, such as on a separate hard drive.
  • A root partition (3.0 GB - 5.0 GB)
    This is where "/" (the root directory) is located. In this setup, all files (except those stored in /boot) are on the root partition.
    A 3.0 GB partition allows you to install a minimal installation, while a 5.0 GB root partition lets you perform a full installation, choosing all package groups.

    Root and /root

    The / (or root) partition is the top of the directory structure. The /root directory/root (sometimes pronounced "slash-root") directory is the home directory of the user account for system administration.
Many systems have more partitions than the minimum listed above. Choose partitions based on your particular system needs. For example, consider creating a separate /home partition on systems that store user data. Refer to Section 8.16.5.1.1, “Advice on Partitions” for more information.
If you create many partitions instead of one large / partition, upgrades become easier. Refer to the description of the Edit option in Section 8.16, “ Creating a Custom Layout or Modifying the Default Layout ” for more information.
The following table summarizes minimum partition sizes for the partitions containing the listed directories. You do not have to make a separate partition for each of these directories. For instance, if the partition containing /foo must be at least 500 MB, and you do not make a separate /foo partition, then the / (root) partition must be at least 500 MB.
Table 8.4. Minimum partition sizes
Directory Minimum size
/ 250 MB
/usr 250 MB, but avoid placing this on a separate partition
/tmp 50 MB
/var 384 MB
/home 100 MB
/boot 250 MB

Leave Excess Capacity Unallocated

Only assign storage capacity to those partitions you require immediately. You may allocate free space at any time, to meet needs as they occur. To learn about a more flexible method for storage management, refer to Appendix D, Understanding LVM.
If you are not sure how best to configure the partitions for your computer, accept the default partition layout.
8.16.5.1.1. Advice on Partitions
Optimal partition setup depends on the usage for the Linux system in question. The following tips may help you decide how to allocate your disk space.
  • If you expect that you or other users will store data on the system, create a separate partition for the /home directory within a volume group. With a separate /home partition, you may upgrade or reinstall Fedora without erasing user data files.
  • Consider encrypting any partitions that might contain sensitive data. Encryption prevents unauthorized people from accessing the data on the partitions, even if they have access to the physical storage device. In most cases, you should at least encrypt the /home partition.
  • Each kernel installed on your system requires approximately 10 MB on the /boot partition. Unless you plan to install a great many kernels, the default partition size of 250 MB for /boot should suffice.

    Important — Supported file systems

    The GRUB bootloader in Fedora 15 supports only the ext2, ext3, and ext4 (recommended) file systems. You cannot use any other file system for /boot, such as Btrfs, XFS, or VFAT.
  • The /var directory holds content for a number of applications, including the Apache web server. It also is used to store downloaded update packages on a temporary basis. Ensure that the partition containing the /var directory has enough space to download pending updates and hold your other content.

    Warning

    The PackageKit update software downloads updated packages to /var/cache/yum/ by default. If you partition the system manually, and create a separate /var/ partition, be sure to create the partition large enough (3.0 GB or more) to download package updates.
  • The /usr directory holds the majority of software content on a Fedora system. For an installation of the default set of software, allocate at least 4 GB of space. If you are a software developer or plan to use your Fedora system to learn software development skills, you may want to at least double this allocation.

    Do not place /usr on a separate partition

    If /usr is on a separate partition from /, the boot process becomes much more complex, and in some situations (like installations on iSCSI drives), might not work at all.
  • Consider leaving a portion of the space in an LVM volume group unallocated. This unallocated space gives you flexibility if your space requirements change but you do not wish to remove data from other partitions to reallocate storage.
  • If you separate subdirectories into partitions, you can retain content in those subdirectories if you decide to install a new version of Fedora over your current system. For instance, if you intend to run a MySQL database in /var/lib/mysql, make a separate partition for that directory in case you need to reinstall later.
The following table is a possible partition setup for a system with a single, new 80 GB hard disk and 1 GB of RAM. Note that approximately 10 GB of the volume group is unallocated to allow for future growth.

Example Usage

This setup is not optimal for all use cases.
Example 8.1. Example partition setup
Table 8.5. Example partition setup
Partition Size and type
/boot 250 MB ext3 partition
swap 2 GB swap
LVM physical volume Remaining space, as one LVM volume group

The physical volume is assigned to the default volume group and divided into the following logical volumes:
Table 8.6. Example partition setup: LVM physical volume
Partition Size and type
/ 13 GB ext4
/var 4 GB ext4
/home 50 GB ext4


http://unix.stackexchange.com/questions/37720/best-disk-partitioning-scheme-for-a-linux-based-developer-machine

On our internal developement virtual machines we use three partitions:
  1. /root partition - housing mostly static operating system stuff
  2. /var partition - for all dynamic data
  3. /home partition - this is where development takes place with the user accounts of the developers
The reason to separate the partitions is to avoid a system halt due to full filesystem. If /home is full - does not matter. No running processes are affected. Delete something, enlarge online and continue.
/ should not change much (the only exception is /tmp - but files there are usually never big).
/var is the place where /var/tmp and all other "live" data resides (including /var/log). A full/var/log is still the number one reason for system/application failures, so /var has to be big enough and there has to be a warning in time when space is becoming sparse there...
On physical machines, where disk space does not matter that much, we divide up additional "partitions" (mostly LVs), including: /var, /var/tmp, /var/log, /tmp, /boot, ... but these are production machines, where uptime matters.

http://unix.stackexchange.com/questions/34744/partitioning-for-web-servers

1) I'd strongly recommend that you use LVM2 (if you can in CentOS, which I'm not too sure, though). If you can, it will be very helpful when you reach that point where partition /var is 99% usage and/home is 1%. You may never use its resizing features, but it really gives (at least to me) peace of mind. One little warning: If you use LVM2 you won't be able to have the /boot folder inside the LVM2 "Volume". It has to be in a separate partition outside the LVM system as a regular partition (at least, that's my belief as of today, Thursday March 22, 2012)
2) I always create, at least, 4 partitions to mount
/
/boot
/var
/home
Sometimes /tmp as well (and swap, but I'm not really counting that one)
/var and /tmp can grow in a kind of uncontrolled way (log files, media going up and down the server, bad stuff). They shouldn't, but they can.
/home because you may want to store some tricks, documents, ideas... stuff that you found when your server was running and if your system blows up, you may want to have a chance of recovering those.

http://linuxmafia.com/~karsten/Linux/FAQs/partition.html

Basic recommendation

    /                   64 - 750+ MiB      (Stock kernel modules are ~100 MiB +)
    /tmp                50 MiB - 2+ GiB     (1 GiB+ to 18 GiB for some CDROM/DVD burning SW)
    /var                4+ GiB             (3 GiB + for Debian users)
    /usr                8 - 16  GiB        (10+ for a generous install)
    /usr/local          1 - 2+  GiB        (Really depends on what you put there)
    /home               remainder          (Music/video generally biggest)
As of Debian 5.0, minimum installation disk requirements are about 500 MiB, with 5 GiB recommended for a desktop install. I'd bump that up to 12-16 GiB, and maybe even 20 GiB allowing for ample space to grow your system data usage. Realize that you're likely going to install more software over time, that that software may grow in size, and and that features you're not directly aware of such as internationalization, documentation, kernel modules, OpenOffice.org modules, and other back-office stuff can account for a surprising amount of space.

Why Partition at All?

A question that's frequently asked is what the use of partitioning is in the first place. After all, doesn't partitioning date back to times when a disk of a hundred, or even tens, of mebibytes, was considered large? Yes, somewhat, but there are other reasons:
  • Reliability: Disk corruption tends to be specific to a given partition. By subsetting your disk(s), you're reducing the amount of space that's going to be affected by any given disk error. If part of your disk goes south, you'll still likely have most of your system available.
  • Containment: It's very helpful to contain runaway processes. By restricting /tmp and /var to their own partitions, you're pretty sure to have space available on the root filesystem or /home even if some process goes crazy with its tempfiles, or your system logs fill up.
  • Security and privileges: By separating out your partitions, you can assign permissions appropriately. As a matter of course, only root and /udev (generally handled automatcially) need be mounted with device permissions, it and /usr are the only partitions needing SUID permissions, /usr can be mounted read-only for the most part, etc. While these permissions can be changed without unmounting a filesystem, they may prevent some system exploits, and will almost certainly keep you from shooting yourself in the foot at some point.
  • Backups: many backup utilities are partition-based, or can be instructed to follow (or restrict themselves to) partition boundaries. Separating system partitions (root, /boot, /etc, /usr, /var) from locally managed (/usr/local, /home) and temporary (/tmp) makes system upgrades and migrations easier to handle as well.
  • Management: With separate partitions, it's possible to back up one partition to another while performing administrative tasks. This is useful should, say, you need to convert between non-interchangeable filesystem types. If possible, having two large filesytems of comperable size may be helpful for on-system management.
  • Overdoing it: yes, you can have too many partitions. Beyond a point, partitioning creates more issues -- you're subdividing your system, cutting into usable space, and adding complexity -- than you're solving. For small systems (< 500 MiB), root, /usr, and swap may be all you need, with /tmp, /var, and /home symlinked under /usr. By priority, I'd create: root, swap, /usr, /boot, /tmp, /var, /home, and /usr/local as separate filesystems, with increasing space.
Among other considerations you might want to take into account are:
  • SSD: Solid-state "flash" drives. These are starting to appear as primary storage on smaller/portable devices, and as ancillary or high-speed storage on desktop and server hardware. Ideally the OS itself would allocate this as a persistant, high-speed cached storage fronting disk, but how this works out is yet to be seen. For the moment, treat as expensive but very fast disk with no seek cost. If you have both SSD and rotational media on the same system, put core OS and swap on SSD. /home, particularly media files, may go on rotational media.
  • Removable storage: Increasingly removeable drives of various sorts are being used with systems. Generally these are managed through automated tools either at the desktop or system level through udev, hotplug, and related tools. None of these solutions appeals to me as being particularly elegant, but then again, this is Linux we're talking about ;-)
  • Networked storage: Though not part of the local partitioning scheme, rationally managing networked storage locations is another part of your storage puzzle. With home LAN/SAN solutions, enterprise requirements, and online storage solutions providers, this becomes yet another management issue.



2013年2月1日 星期五

協助網站製作者做得較專業的工具

http://computer.uwants.com/viewthread.php?tid=15423979&extra=page%3D2

怎樣算是專業好難說,不過可以推介一些可以協助網站製作者做得較專業的工具:
1. Git
http://git-scm.com/
用來作 version control 。
2. PHPUnit
https://github.com/sebastianbergmann/phpunit/
用來寫 PHP unit test 。
3. JSLint
http://www.jslint.com/
用來 check JavaScript 的 code quality 。
4. QUnit
http://qunitjs.com/
用來寫 JavaScript unit test 。
5. W3C Markup Validator
http://validator.w3.org/用來 check html 有沒有寫錯 。
6. PageSpeed Insights
https://developers.google.com/speed/pagespeed/insights
可找出名種與網頁顯示速度相關的問題。


2013年1月11日 星期五

Linux installation tips

http://easyfreeunix.com/content/installing-and-setting-centos-5-server

There are plenty of Youtube videos on installing Linux. I should know, I have done a few. However, it is quite different when you want to set up a server. Installing the default Linux system really is not such a good idea when it comes to setting up a server. For servers, you really want to install the minimum amount of software on the machine as you can get by with. From a security standpoint, this is really important as it leaves fewer places a savvy hacker can get into your system by. It is also important that while maintaining your server, you really do not want to burden your server with updates to software you are not using. Do you really need to suck down bandwidth while your DNS server is getting the lates updates for OpenOffice? Probably not. This video covers installing CentOS 5 (a RedHat Enterprise Linux clone) with the bare minimum stuff. I even skipped the base system, which I show you how to install without any more CD's in subsequent videos. No X Windows, either. As a sys admin, you just do not need it. There are others ways of maintaining your server graphically, without needing to worry about XAuth and which firewall ports to open for X Windows. You could set up ssh to run your X window apps, but come on, really? There is a universal way to manage all your Linux servers, without even going there with running X apps through ssh. And it takes fewer of your server CPU and mem cycles to run things without X. The video is oriented toward systems administrators, but I would love feedback from the novice as well, who wants a Linux server. It will only make me wiser to recieve your feedback! Thanks!


GUI consume too much CPU and RAM

can turn off GUI by
1. vi /etc/inittab
2. change the boot level from 5 to 3.
3. restart the linux
4. see if any change on the cpu/ram consumption


Setup network connection

http://diznix.com/2011/07/11/network-configuration-in-minimal-linux-installs/

# vi /etc/sysconfig/network-scripts/ifcfg-eth0
change:
ONBOOT="yes"


http://www.howtogeek.com/howto/linux/security-tip-disable-root-ssh-login-on-linux/

Security Tip: Disable Root SSH Login on Linux

One of the biggest security holes you could open on your server is to allow directly logging in as root through ssh, because any cracker can attempt to brute force your root password and potentially get access to your system if they can figure out your password.
It’s much better to have a separate account that you regularly use and simply sudo to root when necessary. Before we begin, you should make sure that you have a regular user account and that you can su or sudo to root from it.
To fix this problem, we’ll need to edit the sshd_config file, which is the main configuration file for the sshd service. The location will sometimes be different, but it’s usually in /etc/ssh/. Open the file up while logged on as root.
vi /etc/ssh/sshd_config
Find this section in the file, containing the line with “PermitRootLogin” in it.
#LoginGraceTime 2m
#PermitRootLogin no
#StrictModes yes
#MaxAuthTries 6
Make the line look like this to disable logging in through ssh as root.

PermitRootLogin no
Now you’ll need to restart the sshd service:

/etc/init.d/sshd restart
Now nobody can brute force your root login, at least.


修改主機名稱

# vi /etc/sysconfig/network
Change HOSTNAME

# vi /etc/hosts
Add hostname with the local IP.

/etc/init.d/network restart
It will restart the new network setting.

To verify success or not:
# hostname
# dig www.google.com
# ping (hostname)
# ifconfig eth0

Setting your timezone

http://www.linuxsa.org.au/tips/time.html

The timezone under Linux is set by a symbolic link from /etc/localtime[1] to a file in the /usr/share/zoneinfo[2] directory that corresponds with what timezone you are in. For example, since I'm in South Australia, /etc/localtime is a symlink to /usr/share/zoneinfo/Australia/South. To set this link, type:
ln -sf /usr/share/zoneinfo/your/zone /etc/localtime
Replace your/zone with something like Australia/NSW or Australia/Perth. Have a look in the directories under /usr/share/zoneinfo to see what timezones are available.

To verify:
# date


2012年11月29日 星期四

http://developer.android.com/tools/samples/index.html

Samples

To help you understand some fundamental Android APIs and coding practices, a variety of sample code is available from the Android SDK Manager. Each version of the Android platform available from the SDK Manager offers its own set of sample apps.
To download the samples:
  1. Launch the Android SDK Manager.
    • On Windows, double-click the SDK Manager.exe file at the root of the Android SDK directory.
    • On Mac or Linux, open a terminal to the tools/ directory in the Android SDK, then execute android sdk.
  2. Expand the list of packages for the latest Android platform.
  3. Select and download Samples for SDK.
When the download is complete, you can find the source code for all samples at this location:
<sdk>/samples/android-<version>/
The <version> number corresponds to the platform's API level.
You can easily create new Android projects with the downloaded samples, modify them if you'd like, and then run them on an emulator or device.


http://stackoverflow.com/questions/10829371/sync-data-between-android-app-and-webserver

Sync data between Android App and webserver

I have developed a application in android that I wanna sync data (such as db record, media) between it and a server. If you've seen Evernote or similar Applications, you certainly understand my mean.
I have some question(imagine we want to sync DB records):
  1. Every user has a part of server space for himself(such as Evernote or Dropbox). Maybe user create new records by cellphone and create new records in server or anyway. How can I match these records together? If there are records with sane ID What algorithms do you suggest me?
  2. Except JSON, Are there any way for send data between cellphone device and server?
  3. If SyncAdapter and ContentProvider can solve my problems, please explain exactly for me. (If you could offer some samples or tutorials to me OR Any advice or keywords to help broaden/guide my search would be appreciated as well).
First you need to figure out(decide on) your communication protocol with the server - hence - what data you can transfer and how. – hovanessyan May 31 at 7:48

That is Important for me, transfer SQLlite data. but I would know how transfer other data. I don't understand your mean about protocol. please more explain. – omid nazifi May 31 at 8:01


I'll try to answer all your questions by addressing the larger question: How can I sync data between a webserver and an android app?

Syncing data between your webserver and an android app requires a couple of different components on your android device.

Persistent Storage:

This is how your phone actually stores the data it receives from the webserver. One possible method for accomplishing this is writing your own custom ContentProvider backed by a Sqlite database. A decent tutorial for a content provider can be found here: http://thinkandroid.wordpress.com/2010/01/13/writing-your-own-contentprovider/
A ContentProvider defines a consistent interface to interact with your stored data. It could also allow other applications to interact with your data if you wanted. Behind your ContentProvider could be a Sqlite database, a Cache, or any arbitrary storage mechanism.
While I would certainly recommend using a ContentProvider with a Sqlite database you could certainly use any java based storage mechanism you wanted.

Data Interchange Format:

This is the format you use to send the data between your webserver and your android app. The two most popular formats these days are XML and JSON. When choosing your format, you should think about what sort of serialization libraries are available. I know off-hand that there's a fantastic library for json serialization called gson: http://code.google.com/p/google-gson/, although I'm sure similar libraries exist for XML.

Synchronization Service

You'll want some sort of asynchronous task which can get new data from your server and refresh the mobile content to reflect the content of the server. You'll also want to notify the server whenever you make local changes to content and want to reflect those changes. Android provides the SyncAdapter pattern as a way to easily solve this pattern. You'll need to register user accounts, and then Android will perform lots of magic for you, and allow you to automatically sync. Here's a good tutorial: http://www.c99.org/2010/01/23/writing-an-android-sync-provider-part-1/

As for how you identify if the records are the same, typically you'll create items with a unique id which you store both on the android device and the server. You can use that to make sure you're referring to the same reference. Furthermore, you can store column attributes like "updated_at" to make sure that you're always getting the freshest data, or you don't accidentally write over newly written data.
Hope this helps.


http://www.c99.org/2010/01/23/writing-an-android-sync-provider-part-1/

Writing an Android Sync Provider: Part 1

One of the highlights of the Android 2.0 SDK is that you can write custom sync providers to integrate with the system contacts, calendars, etc. The only problem is that there’s very little documentation on how it all fits together. And worse, if you mess up in certain places, the Android system will crash and reboot! Always up for a challenge, I’ve navigated through the sparse documentation, vague mailing list posts, and the Android source code itself to build a sync provider for our Last.fm app. Want to know how to build your own? Read on!

Account Authenticators

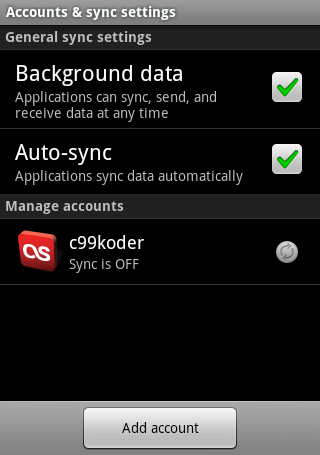
The first piece of the puzzle is called an Account Authenticator, which defines how the user’s account will appear in the “Accounts & Sync” settings. Implementing an Account Authenticator requires 3 pieces: a service that returns a subclass of AbstractAccountAuthenticator from the onBind method, an activity to prompt the user to enter their credentials, and an xml file describing how your account should look when displayed to the user. You’ll also need to add the android.permission.AUTHENTICATE_ACCOUNTS permission to your AndroidManifest.xml.

The Service

The authenticator service is expected to return a subclass of AbstractAccountAuthenticator from the onBind method — if you don’t, Android will crash and reboot when you try to add a new account to the system. The only method in AbstractAccountAuthenticator we really need to implement is addAccount, which returns an Intent that the system will use to display the login dialog to the user. The implementation below will launch our app’s main launcher activity with an action of “fm.last.android.sync.LOGIN” and an extra containing the AccountAuthenticatorResponse object we use to pass data back to the system after the user has logged in.

AccountAuthenticatorService.java

  1. import fm.last.android.LastFm;
  2. import android.accounts.AbstractAccountAuthenticator;
  3. import android.accounts.Account;
  4. import android.accounts.AccountAuthenticatorResponse;
  5. import android.accounts.AccountManager;
  6. import android.accounts.NetworkErrorException;
  7. import android.app.Service;
  8. import android.content.Context;
  9. import android.content.Intent;
  10. import android.os.Bundle;
  11. import android.os.IBinder;
  12. import android.util.Log;
  13. /**
  14.  * Authenticator service that returns a subclass of AbstractAccountAuthenticator in onBind()
  15.  */
  16. public class AccountAuthenticatorService extends Service {
  17.  private static final String TAG = "AccountAuthenticatorService";
  18.  private static AccountAuthenticatorImpl sAccountAuthenticator = null;
  19.  public AccountAuthenticatorService() {
  20.   super();
  21.  }
  22.  public IBinder onBind(Intent intent) {
  23.   IBinder ret = null;
  24.   if (intent.getAction().equals(android.accounts.AccountManager.ACTION_AUTHENTICATOR_INTENT))
  25.    ret = getAuthenticator().getIBinder();
  26.   return ret;
  27.  }
  28.  private AccountAuthenticatorImpl getAuthenticator() {
  29.   if (sAccountAuthenticator == null)
  30.    sAccountAuthenticator = new AccountAuthenticatorImpl(this);
  31.   return sAccountAuthenticator;
  32.  }
  33.  private static class AccountAuthenticatorImpl extends AbstractAccountAuthenticator {
  34.   private Context mContext;
  35.   public AccountAuthenticatorImpl(Context context) {
  36.    super(context);
  37.    mContext = context;
  38.   }
  39.   /*
  40.    *  The user has requested to add a new account to the system.  We return an intent that will launch our login screen if the user has not logged in yet,
  41.    *  otherwise our activity will just pass the user's credentials on to the account manager.
  42.    */
  43.   @Override
  44.   public Bundle addAccount(AccountAuthenticatorResponse response, String accountType, String authTokenType, String[] requiredFeatures, Bundle options)
  45.     throws NetworkErrorException {
  46.    Bundle reply = new Bundle();
  47.    
  48.    Intent i = new Intent(mContext, LastFm.class);
  49.    i.setAction("fm.last.android.sync.LOGIN");
  50.    i.putExtra(AccountManager.KEY_ACCOUNT_AUTHENTICATOR_RESPONSE, response);
  51.    reply.putParcelable(AccountManager.KEY_INTENT, i);
  52.    
  53.    return reply;
  54.   }
  55.   @Override
  56.   public Bundle confirmCredentials(AccountAuthenticatorResponse response, Account account, Bundle options) {
  57.    return null;
  58.   }
  59.   @Override
  60.   public Bundle editProperties(AccountAuthenticatorResponse response, String accountType) {
  61.    return null;
  62.   }
  63.   @Override
  64.   public Bundle getAuthToken(AccountAuthenticatorResponse response, Account account, String authTokenType, Bundle options) throws NetworkErrorException {
  65.    return null;
  66.   }
  67.   @Override
  68.   public String getAuthTokenLabel(String authTokenType) {
  69.    return null;
  70.   }
  71.   @Override
  72.   public Bundle hasFeatures(AccountAuthenticatorResponse response, Account account, String[] features) throws NetworkErrorException {
  73.    return null;
  74.   }
  75.   @Override
  76.   public Bundle updateCredentials(AccountAuthenticatorResponse response, Account account, String authTokenType, Bundle options) {
  77.    return null;
  78.   }
  79.  }
  80. }
The account authenticator service should be defined in your AndroidManifest.xml, with a meta-data tag referencing an xml definition file, as follows:

Snippet from AndroidManifest.xml

  1. <service android:name="AccountAuthenticatorService"
  2.  android:exported="true" android:process=":auth">
  3.  <intent-filter>
  4.   <action android:name="android.accounts.AccountAuthenticator" />
  5.  </intent-filter>
  6.  <meta-data android:name="android.accounts.AccountAuthenticator"
  7.   android:resource="@xml/authenticator" />
  8. </service>

The Activity

If you don’t already have a login screen, there’s a convenience class AccountAuthenticatorActivity you can subclass that will pass your response back to the authentication manager for you, however if you already have a login activity in place you may find it easier to just pass the data back yourself, as I have done here. When the user has successfully been authenticated, we create an Account object for the user’s credentials. An account has an account name, such as the username or email address, and an account type, which you will define in your xml file next. You may find it easier to store your account type in strings.xml and use getString() to fetch it, as it is used in multiple places.

Snippet from the Last.fm login activity

  1. Account account = new Account(username, getString(R.string.ACCOUNT_TYPE)));
  2. AccountManager am = AccountManager.get(this);
  3. boolean accountCreated = am.addAccountExplicitly(account, password, null);
  4. Bundle extras = getIntent.getExtras();
  5. if (extras != null) {
  6.  if (accountCreated) {  //Pass the new account back to the account manager
  7.   AccountAuthenticatorResponse response = extras.getParcelable(AccountManager.KEY_ACCOUNT_AUTHENTICATOR_RESPONSE);
  8.   Bundle result = new Bundle();
  9.   result.putString(AccountManager.KEY_ACCOUNT_NAME, username);
  10.   result.putString(AccountManager.KEY_ACCOUNT_TYPE, getString(R.string.ACCOUNT_TYPE));
  11.   response.onResult(result);
  12.  }
  13.  finish();
  14. }

The XML definition file

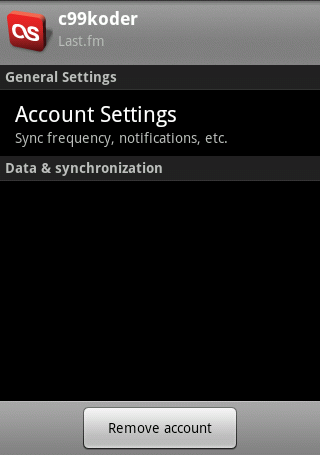
The account xml file defines what the user will see when they’re interacting with your account. It contains a user-readable name, the system account type you’re defining, various icons, and a reference to an xml file containing PreferenceScreens the user will see when modifying your account.

authenticator.xml

  1. <account-authenticator xmlns:android="http://schemas.android.com/apk/res/android"
  2.     android:accountType="fm.last.android.account"
  3.     android:icon="@drawable/icon"
  4.     android:smallIcon="@drawable/icon"
  5.     android:label="@string/app_name"
  6.     android:accountPreferences="@xml/account_preferences"/>

account_preferences.xml

  1. <PreferenceScreen
  2.   xmlns:android="http://schemas.android.com/apk/res/android">
  3.     <PreferenceCategory
  4.             android:title="General Settings" />
  5.     <PreferenceScreen
  6.         android:key="account_settings"
  7.         android:title="Account Settings"
  8.         android:summary="Sync frequency, notifications, etc.">
  9.         <intent
  10.             android:action="fm.last.android.activity.Preferences.ACCOUNT_SETUP"
  11.             android:targetPackage="fm.last.android"
  12.             android:targetClass="fm.last.android.activity.Preferences" />
  13.     </PreferenceScreen>
  14. </PreferenceScreen>

Putting it all together

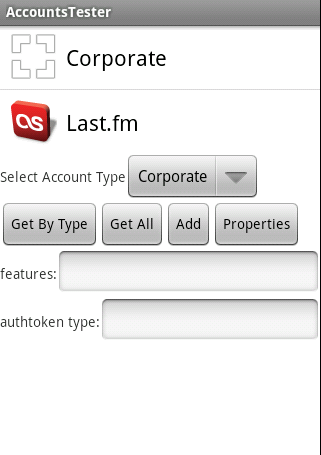
Now we’re ready for testing! The Android accounts setting screen doesn’t handle exceptions very well — if something goes wrong, your device will reboot! A better way to test is to launch the emulator, run the “Dev Tools” app, and pick “AccountsTester”.

You should see your new account type in the list, along with the built-in “Corporate” account type. Go ahead and select your account type from the drop-down list, and then press the “Add” button, and you should be presented with your login activity. After authenticating, your account should appear in a list below the buttons. At this point, it should be safe to use the system “Accounts & Sync” settings screen to remove or modify your account.

Ready to fill in that section below “Data & synchronization”? Let’s move on to part 2!
The source code for the implementation referenced here is available in my Last.fm github project under the terms of the GNU General Public License. A standalone sample project is also available here under the terms of the Apache License 2.0. Google has also released their own sample sync provider on the Android developer portal that’s a bit more complete than mine.


主機規劃與磁碟分割

http://linux.vbird.org/linux_basic/0130designlinux.php

各硬體裝置在Linux中的檔名

在Linux系統中,每個裝置都被當成一個檔案來對待


裝置裝置在Linux內的檔名
IDE硬碟機/dev/hd[a-d]
SCSI/SATA/USB硬碟機/dev/sd[a-p]
USB快閃碟/dev/sd[a-p](與SATA相同)
軟碟機/dev/fd[0-1]
印表機25針: /dev/lp[0-2]
USB: /dev/usb/lp[0-15]
滑鼠USB: /dev/usb/mouse[0-15]
PS2: /dev/psaux
當前CDROM/DVDROM/dev/cdrom
當前的滑鼠/dev/mouse
磁帶機IDE: /dev/ht0
SCSI: /dev/st0

FooTable - extensible HTML table

在不同闊度的screen可以將部份column隱藏, click + 號才顯示某row隱藏了的資料.

http://themergency.com/footable/


FooTable

FooTable is a jQuery plugin that aims to make HTML tables on smaller devices look awesome - No matter how many columns of data you may have in them.


What Does It Do?

FooTable transforms your HTML tables into expandable responsive tables. This is how it works:
  1. It hides certain columns of data at different resolutions (we call these breakpoints).
  2. Rows become expandable to show the data that was hidden.
So simple! So all the data that is hidden can always be seen just by clicking the row. Play around with the responsive demo to see it in action.

Demo

Check out the stand-alone demo (you will have to resize the broswer to see it work) or check out the responsive demo and just click the device buttons.

Download

Get the source from Github, or you can download it direct.

2012年10月16日 星期二

Photo display

http://www.onextrapixel.com/2012/03/29/15-stunning-jquery-lightbox-plug-ins-for-your-upcoming-designs/

http://www.1stwebdesigner.com/css/fresh-jquery-image-gallery-display-solutions/


Color Box
A lightweight customizable lightbox plug-in for jQuery 1.3+
Color Box

Lightbox 2
Lightbox 2 is a simple, unobtrusive script used to overlay images on the current page. It's a snap to set up and works on all modern browsers.
Lightbox 2


prettyPhoto
prettyPhoto is a jQuery lightbox clone. Not only does it support images, it also supports videos, flash, YouTube, frames and Ajax. It’s a full blown media lightbox.
prettyPhoto

Slimbox 2
Slimbox 2 is a 4 KB visual clone of the popular Light box 2 script by Lokesh Dhaka, written using the jQuery JavaScript library.
Slimbox 2


Fancy Box
Fancy Box is a tool for displaying images, HTML content and multimedia in a Mac-style "light box" that floats overtop of web page.
Fancy Box

jQuery Lightbox Plug-in
JQuery lightbox plug-in is simple, elegant, and unobtrusive, no need for extra markup, and is used to overlay images on the current page through the power and flexibility of jQuery´s selector.
jQuery Lightbox Plug-in
Ceebox
An overlay pop-up script for easily embedding flash video, displaying images, or showing HTML (either external sites via iframe or content on your own site via AJAX).
Ceebox


Create Beautiful jQuery slider tutorial

This tutorial explains how to develop Create Beautiful jQuery sliders tutorial with image description and name.
beautiful-gallery-jquery-image-slideshow-tools-free
View Demo