2013年1月11日 星期五

Linux installation tips

http://easyfreeunix.com/content/installing-and-setting-centos-5-server

There are plenty of Youtube videos on installing Linux. I should know, I have done a few. However, it is quite different when you want to set up a server. Installing the default Linux system really is not such a good idea when it comes to setting up a server. For servers, you really want to install the minimum amount of software on the machine as you can get by with. From a security standpoint, this is really important as it leaves fewer places a savvy hacker can get into your system by. It is also important that while maintaining your server, you really do not want to burden your server with updates to software you are not using. Do you really need to suck down bandwidth while your DNS server is getting the lates updates for OpenOffice? Probably not. This video covers installing CentOS 5 (a RedHat Enterprise Linux clone) with the bare minimum stuff. I even skipped the base system, which I show you how to install without any more CD's in subsequent videos. No X Windows, either. As a sys admin, you just do not need it. There are others ways of maintaining your server graphically, without needing to worry about XAuth and which firewall ports to open for X Windows. You could set up ssh to run your X window apps, but come on, really? There is a universal way to manage all your Linux servers, without even going there with running X apps through ssh. And it takes fewer of your server CPU and mem cycles to run things without X. The video is oriented toward systems administrators, but I would love feedback from the novice as well, who wants a Linux server. It will only make me wiser to recieve your feedback! Thanks!


GUI consume too much CPU and RAM

can turn off GUI by
1. vi /etc/inittab
2. change the boot level from 5 to 3.
3. restart the linux
4. see if any change on the cpu/ram consumption


Setup network connection

http://diznix.com/2011/07/11/network-configuration-in-minimal-linux-installs/

# vi /etc/sysconfig/network-scripts/ifcfg-eth0
change:
ONBOOT="yes"


http://www.howtogeek.com/howto/linux/security-tip-disable-root-ssh-login-on-linux/

Security Tip: Disable Root SSH Login on Linux

One of the biggest security holes you could open on your server is to allow directly logging in as root through ssh, because any cracker can attempt to brute force your root password and potentially get access to your system if they can figure out your password.
It’s much better to have a separate account that you regularly use and simply sudo to root when necessary. Before we begin, you should make sure that you have a regular user account and that you can su or sudo to root from it.
To fix this problem, we’ll need to edit the sshd_config file, which is the main configuration file for the sshd service. The location will sometimes be different, but it’s usually in /etc/ssh/. Open the file up while logged on as root.
vi /etc/ssh/sshd_config
Find this section in the file, containing the line with “PermitRootLogin” in it.
#LoginGraceTime 2m
#PermitRootLogin no
#StrictModes yes
#MaxAuthTries 6
Make the line look like this to disable logging in through ssh as root.

PermitRootLogin no
Now you’ll need to restart the sshd service:

/etc/init.d/sshd restart
Now nobody can brute force your root login, at least.


修改主機名稱

# vi /etc/sysconfig/network
Change HOSTNAME

# vi /etc/hosts
Add hostname with the local IP.

/etc/init.d/network restart
It will restart the new network setting.

To verify success or not:
# hostname
# dig www.google.com
# ping (hostname)
# ifconfig eth0

Setting your timezone

http://www.linuxsa.org.au/tips/time.html

The timezone under Linux is set by a symbolic link from /etc/localtime[1] to a file in the /usr/share/zoneinfo[2] directory that corresponds with what timezone you are in. For example, since I'm in South Australia, /etc/localtime is a symlink to /usr/share/zoneinfo/Australia/South. To set this link, type:
ln -sf /usr/share/zoneinfo/your/zone /etc/localtime
Replace your/zone with something like Australia/NSW or Australia/Perth. Have a look in the directories under /usr/share/zoneinfo to see what timezones are available.

To verify:
# date


2012年11月29日 星期四

http://developer.android.com/tools/samples/index.html

Samples

To help you understand some fundamental Android APIs and coding practices, a variety of sample code is available from the Android SDK Manager. Each version of the Android platform available from the SDK Manager offers its own set of sample apps.
To download the samples:
  1. Launch the Android SDK Manager.
    • On Windows, double-click the SDK Manager.exe file at the root of the Android SDK directory.
    • On Mac or Linux, open a terminal to the tools/ directory in the Android SDK, then execute android sdk.
  2. Expand the list of packages for the latest Android platform.
  3. Select and download Samples for SDK.
When the download is complete, you can find the source code for all samples at this location:
<sdk>/samples/android-<version>/
The <version> number corresponds to the platform's API level.
You can easily create new Android projects with the downloaded samples, modify them if you'd like, and then run them on an emulator or device.


http://stackoverflow.com/questions/10829371/sync-data-between-android-app-and-webserver

Sync data between Android App and webserver

I have developed a application in android that I wanna sync data (such as db record, media) between it and a server. If you've seen Evernote or similar Applications, you certainly understand my mean.
I have some question(imagine we want to sync DB records):
  1. Every user has a part of server space for himself(such as Evernote or Dropbox). Maybe user create new records by cellphone and create new records in server or anyway. How can I match these records together? If there are records with sane ID What algorithms do you suggest me?
  2. Except JSON, Are there any way for send data between cellphone device and server?
  3. If SyncAdapter and ContentProvider can solve my problems, please explain exactly for me. (If you could offer some samples or tutorials to me OR Any advice or keywords to help broaden/guide my search would be appreciated as well).
First you need to figure out(decide on) your communication protocol with the server - hence - what data you can transfer and how. – hovanessyan May 31 at 7:48

That is Important for me, transfer SQLlite data. but I would know how transfer other data. I don't understand your mean about protocol. please more explain. – omid nazifi May 31 at 8:01


I'll try to answer all your questions by addressing the larger question: How can I sync data between a webserver and an android app?

Syncing data between your webserver and an android app requires a couple of different components on your android device.

Persistent Storage:

This is how your phone actually stores the data it receives from the webserver. One possible method for accomplishing this is writing your own custom ContentProvider backed by a Sqlite database. A decent tutorial for a content provider can be found here: http://thinkandroid.wordpress.com/2010/01/13/writing-your-own-contentprovider/
A ContentProvider defines a consistent interface to interact with your stored data. It could also allow other applications to interact with your data if you wanted. Behind your ContentProvider could be a Sqlite database, a Cache, or any arbitrary storage mechanism.
While I would certainly recommend using a ContentProvider with a Sqlite database you could certainly use any java based storage mechanism you wanted.

Data Interchange Format:

This is the format you use to send the data between your webserver and your android app. The two most popular formats these days are XML and JSON. When choosing your format, you should think about what sort of serialization libraries are available. I know off-hand that there's a fantastic library for json serialization called gson: http://code.google.com/p/google-gson/, although I'm sure similar libraries exist for XML.

Synchronization Service

You'll want some sort of asynchronous task which can get new data from your server and refresh the mobile content to reflect the content of the server. You'll also want to notify the server whenever you make local changes to content and want to reflect those changes. Android provides the SyncAdapter pattern as a way to easily solve this pattern. You'll need to register user accounts, and then Android will perform lots of magic for you, and allow you to automatically sync. Here's a good tutorial: http://www.c99.org/2010/01/23/writing-an-android-sync-provider-part-1/

As for how you identify if the records are the same, typically you'll create items with a unique id which you store both on the android device and the server. You can use that to make sure you're referring to the same reference. Furthermore, you can store column attributes like "updated_at" to make sure that you're always getting the freshest data, or you don't accidentally write over newly written data.
Hope this helps.


http://www.c99.org/2010/01/23/writing-an-android-sync-provider-part-1/

Writing an Android Sync Provider: Part 1

One of the highlights of the Android 2.0 SDK is that you can write custom sync providers to integrate with the system contacts, calendars, etc. The only problem is that there’s very little documentation on how it all fits together. And worse, if you mess up in certain places, the Android system will crash and reboot! Always up for a challenge, I’ve navigated through the sparse documentation, vague mailing list posts, and the Android source code itself to build a sync provider for our Last.fm app. Want to know how to build your own? Read on!

Account Authenticators

The first piece of the puzzle is called an Account Authenticator, which defines how the user’s account will appear in the “Accounts & Sync” settings. Implementing an Account Authenticator requires 3 pieces: a service that returns a subclass of AbstractAccountAuthenticator from the onBind method, an activity to prompt the user to enter their credentials, and an xml file describing how your account should look when displayed to the user. You’ll also need to add the android.permission.AUTHENTICATE_ACCOUNTS permission to your AndroidManifest.xml.

The Service

The authenticator service is expected to return a subclass of AbstractAccountAuthenticator from the onBind method — if you don’t, Android will crash and reboot when you try to add a new account to the system. The only method in AbstractAccountAuthenticator we really need to implement is addAccount, which returns an Intent that the system will use to display the login dialog to the user. The implementation below will launch our app’s main launcher activity with an action of “fm.last.android.sync.LOGIN” and an extra containing the AccountAuthenticatorResponse object we use to pass data back to the system after the user has logged in.

AccountAuthenticatorService.java

  1. import fm.last.android.LastFm;
  2. import android.accounts.AbstractAccountAuthenticator;
  3. import android.accounts.Account;
  4. import android.accounts.AccountAuthenticatorResponse;
  5. import android.accounts.AccountManager;
  6. import android.accounts.NetworkErrorException;
  7. import android.app.Service;
  8. import android.content.Context;
  9. import android.content.Intent;
  10. import android.os.Bundle;
  11. import android.os.IBinder;
  12. import android.util.Log;
  13. /**
  14.  * Authenticator service that returns a subclass of AbstractAccountAuthenticator in onBind()
  15.  */
  16. public class AccountAuthenticatorService extends Service {
  17.  private static final String TAG = "AccountAuthenticatorService";
  18.  private static AccountAuthenticatorImpl sAccountAuthenticator = null;
  19.  public AccountAuthenticatorService() {
  20.   super();
  21.  }
  22.  public IBinder onBind(Intent intent) {
  23.   IBinder ret = null;
  24.   if (intent.getAction().equals(android.accounts.AccountManager.ACTION_AUTHENTICATOR_INTENT))
  25.    ret = getAuthenticator().getIBinder();
  26.   return ret;
  27.  }
  28.  private AccountAuthenticatorImpl getAuthenticator() {
  29.   if (sAccountAuthenticator == null)
  30.    sAccountAuthenticator = new AccountAuthenticatorImpl(this);
  31.   return sAccountAuthenticator;
  32.  }
  33.  private static class AccountAuthenticatorImpl extends AbstractAccountAuthenticator {
  34.   private Context mContext;
  35.   public AccountAuthenticatorImpl(Context context) {
  36.    super(context);
  37.    mContext = context;
  38.   }
  39.   /*
  40.    *  The user has requested to add a new account to the system.  We return an intent that will launch our login screen if the user has not logged in yet,
  41.    *  otherwise our activity will just pass the user's credentials on to the account manager.
  42.    */
  43.   @Override
  44.   public Bundle addAccount(AccountAuthenticatorResponse response, String accountType, String authTokenType, String[] requiredFeatures, Bundle options)
  45.     throws NetworkErrorException {
  46.    Bundle reply = new Bundle();
  47.    
  48.    Intent i = new Intent(mContext, LastFm.class);
  49.    i.setAction("fm.last.android.sync.LOGIN");
  50.    i.putExtra(AccountManager.KEY_ACCOUNT_AUTHENTICATOR_RESPONSE, response);
  51.    reply.putParcelable(AccountManager.KEY_INTENT, i);
  52.    
  53.    return reply;
  54.   }
  55.   @Override
  56.   public Bundle confirmCredentials(AccountAuthenticatorResponse response, Account account, Bundle options) {
  57.    return null;
  58.   }
  59.   @Override
  60.   public Bundle editProperties(AccountAuthenticatorResponse response, String accountType) {
  61.    return null;
  62.   }
  63.   @Override
  64.   public Bundle getAuthToken(AccountAuthenticatorResponse response, Account account, String authTokenType, Bundle options) throws NetworkErrorException {
  65.    return null;
  66.   }
  67.   @Override
  68.   public String getAuthTokenLabel(String authTokenType) {
  69.    return null;
  70.   }
  71.   @Override
  72.   public Bundle hasFeatures(AccountAuthenticatorResponse response, Account account, String[] features) throws NetworkErrorException {
  73.    return null;
  74.   }
  75.   @Override
  76.   public Bundle updateCredentials(AccountAuthenticatorResponse response, Account account, String authTokenType, Bundle options) {
  77.    return null;
  78.   }
  79.  }
  80. }
The account authenticator service should be defined in your AndroidManifest.xml, with a meta-data tag referencing an xml definition file, as follows:

Snippet from AndroidManifest.xml

  1. <service android:name="AccountAuthenticatorService"
  2.  android:exported="true" android:process=":auth">
  3.  <intent-filter>
  4.   <action android:name="android.accounts.AccountAuthenticator" />
  5.  </intent-filter>
  6.  <meta-data android:name="android.accounts.AccountAuthenticator"
  7.   android:resource="@xml/authenticator" />
  8. </service>

The Activity

If you don’t already have a login screen, there’s a convenience class AccountAuthenticatorActivity you can subclass that will pass your response back to the authentication manager for you, however if you already have a login activity in place you may find it easier to just pass the data back yourself, as I have done here. When the user has successfully been authenticated, we create an Account object for the user’s credentials. An account has an account name, such as the username or email address, and an account type, which you will define in your xml file next. You may find it easier to store your account type in strings.xml and use getString() to fetch it, as it is used in multiple places.

Snippet from the Last.fm login activity

  1. Account account = new Account(username, getString(R.string.ACCOUNT_TYPE)));
  2. AccountManager am = AccountManager.get(this);
  3. boolean accountCreated = am.addAccountExplicitly(account, password, null);
  4. Bundle extras = getIntent.getExtras();
  5. if (extras != null) {
  6.  if (accountCreated) {  //Pass the new account back to the account manager
  7.   AccountAuthenticatorResponse response = extras.getParcelable(AccountManager.KEY_ACCOUNT_AUTHENTICATOR_RESPONSE);
  8.   Bundle result = new Bundle();
  9.   result.putString(AccountManager.KEY_ACCOUNT_NAME, username);
  10.   result.putString(AccountManager.KEY_ACCOUNT_TYPE, getString(R.string.ACCOUNT_TYPE));
  11.   response.onResult(result);
  12.  }
  13.  finish();
  14. }

The XML definition file

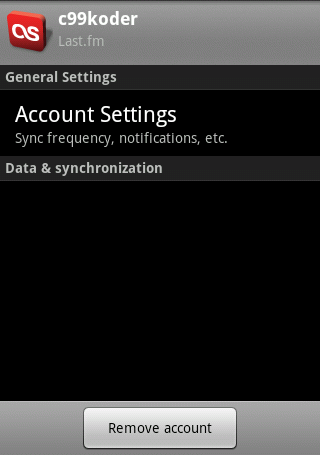
The account xml file defines what the user will see when they’re interacting with your account. It contains a user-readable name, the system account type you’re defining, various icons, and a reference to an xml file containing PreferenceScreens the user will see when modifying your account.

authenticator.xml

  1. <account-authenticator xmlns:android="http://schemas.android.com/apk/res/android"
  2.     android:accountType="fm.last.android.account"
  3.     android:icon="@drawable/icon"
  4.     android:smallIcon="@drawable/icon"
  5.     android:label="@string/app_name"
  6.     android:accountPreferences="@xml/account_preferences"/>

account_preferences.xml

  1. <PreferenceScreen
  2.   xmlns:android="http://schemas.android.com/apk/res/android">
  3.     <PreferenceCategory
  4.             android:title="General Settings" />
  5.     <PreferenceScreen
  6.         android:key="account_settings"
  7.         android:title="Account Settings"
  8.         android:summary="Sync frequency, notifications, etc.">
  9.         <intent
  10.             android:action="fm.last.android.activity.Preferences.ACCOUNT_SETUP"
  11.             android:targetPackage="fm.last.android"
  12.             android:targetClass="fm.last.android.activity.Preferences" />
  13.     </PreferenceScreen>
  14. </PreferenceScreen>

Putting it all together

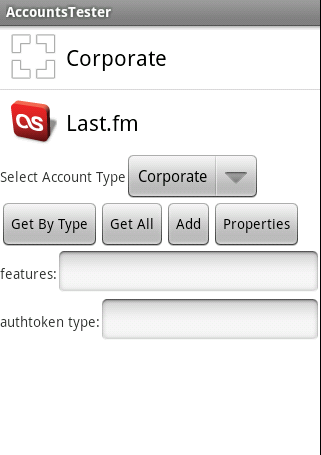
Now we’re ready for testing! The Android accounts setting screen doesn’t handle exceptions very well — if something goes wrong, your device will reboot! A better way to test is to launch the emulator, run the “Dev Tools” app, and pick “AccountsTester”.

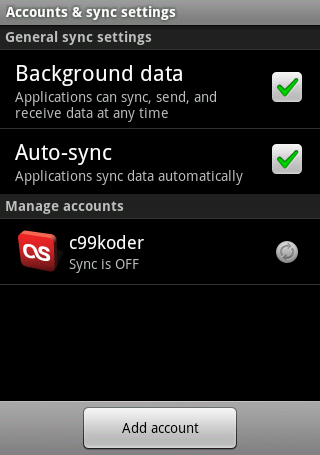
You should see your new account type in the list, along with the built-in “Corporate” account type. Go ahead and select your account type from the drop-down list, and then press the “Add” button, and you should be presented with your login activity. After authenticating, your account should appear in a list below the buttons. At this point, it should be safe to use the system “Accounts & Sync” settings screen to remove or modify your account.

Ready to fill in that section below “Data & synchronization”? Let’s move on to part 2!
The source code for the implementation referenced here is available in my Last.fm github project under the terms of the GNU General Public License. A standalone sample project is also available here under the terms of the Apache License 2.0. Google has also released their own sample sync provider on the Android developer portal that’s a bit more complete than mine.


主機規劃與磁碟分割

http://linux.vbird.org/linux_basic/0130designlinux.php

各硬體裝置在Linux中的檔名

在Linux系統中,每個裝置都被當成一個檔案來對待


裝置裝置在Linux內的檔名
IDE硬碟機/dev/hd[a-d]
SCSI/SATA/USB硬碟機/dev/sd[a-p]
USB快閃碟/dev/sd[a-p](與SATA相同)
軟碟機/dev/fd[0-1]
印表機25針: /dev/lp[0-2]
USB: /dev/usb/lp[0-15]
滑鼠USB: /dev/usb/mouse[0-15]
PS2: /dev/psaux
當前CDROM/DVDROM/dev/cdrom
當前的滑鼠/dev/mouse
磁帶機IDE: /dev/ht0
SCSI: /dev/st0

FooTable - extensible HTML table

在不同闊度的screen可以將部份column隱藏, click + 號才顯示某row隱藏了的資料.

http://themergency.com/footable/


FooTable

FooTable is a jQuery plugin that aims to make HTML tables on smaller devices look awesome - No matter how many columns of data you may have in them.


What Does It Do?

FooTable transforms your HTML tables into expandable responsive tables. This is how it works:
  1. It hides certain columns of data at different resolutions (we call these breakpoints).
  2. Rows become expandable to show the data that was hidden.
So simple! So all the data that is hidden can always be seen just by clicking the row. Play around with the responsive demo to see it in action.

Demo

Check out the stand-alone demo (you will have to resize the broswer to see it work) or check out the responsive demo and just click the device buttons.

Download

Get the source from Github, or you can download it direct.

2012年10月16日 星期二

Photo display

http://www.onextrapixel.com/2012/03/29/15-stunning-jquery-lightbox-plug-ins-for-your-upcoming-designs/

http://www.1stwebdesigner.com/css/fresh-jquery-image-gallery-display-solutions/


Color Box
A lightweight customizable lightbox plug-in for jQuery 1.3+
Color Box

Lightbox 2
Lightbox 2 is a simple, unobtrusive script used to overlay images on the current page. It's a snap to set up and works on all modern browsers.
Lightbox 2


prettyPhoto
prettyPhoto is a jQuery lightbox clone. Not only does it support images, it also supports videos, flash, YouTube, frames and Ajax. It’s a full blown media lightbox.
prettyPhoto

Slimbox 2
Slimbox 2 is a 4 KB visual clone of the popular Light box 2 script by Lokesh Dhaka, written using the jQuery JavaScript library.
Slimbox 2


Fancy Box
Fancy Box is a tool for displaying images, HTML content and multimedia in a Mac-style "light box" that floats overtop of web page.
Fancy Box

jQuery Lightbox Plug-in
JQuery lightbox plug-in is simple, elegant, and unobtrusive, no need for extra markup, and is used to overlay images on the current page through the power and flexibility of jQuery´s selector.
jQuery Lightbox Plug-in
Ceebox
An overlay pop-up script for easily embedding flash video, displaying images, or showing HTML (either external sites via iframe or content on your own site via AJAX).
Ceebox


Create Beautiful jQuery slider tutorial

This tutorial explains how to develop Create Beautiful jQuery sliders tutorial with image description and name.
beautiful-gallery-jquery-image-slideshow-tools-free
View Demo


Navigation Menu

http://www.dynamicwp.net/articles-and-tutorials/15-really-amazing-jquery-navigation-menu/


Rocking and Rolling Rounded Menu with jQuery

15 Really Amazing jQuery Navigation Menu
by Mary Lou
In this tutorial we are going to make use of the incredibly awesome rotating and scaling jQuery patch from Zachary Johnson that can be found here. We will create a menu with little icons that will rotate when hovering. Also, we will make the menu item expand and reveal some menu content, like links or a search box.

Halftone Navigation Menu With jQuery & CSS3

15 Really Amazing jQuery Navigation Menu
by Martin Angelov
Today we are making a CSS3 & jQuery halftone-style navigation menu, which will allow you to display animated halftone-style shapes in accordance with the navigation links, and will provide a simple editor for creating additional shapes as well.

Beautiful Slide Out Navigation- A CSS and jQuery Tutorial

15 Really Amazing jQuery Navigation Menu
by Mary Lou
Today I want to show you how to create an amazing slide out menu or navigation for your website. The navigation will be almost hidden – the items only slide out when the user hovers over the area next to them. This gives a beautiful effect and using this technique can spare you some space on your website. The items will be semi-transparent which means that content under them will not be completely hidden.

How To Create a Cool Animated Menu with jQuery

15 Really Amazing jQuery Navigation Menu
by Chris Spooner
In this tutorial we’ll be building a cool navigation list complete with a sliding hover effect. Learn how to build the concept in Photoshop, lay out the basic HTML elements, style everything up in CSS then tie it all together with a few lines of jQuery to create a semantic, accessible and degradable menu design.

Beautiful Background Image Navigation with jQuery

15 Really Amazing jQuery Navigation Menu
by Mary Lou
In this tutorial we are going to create a beautiful navigation that has a background image slide effect. The main idea is to have three list items that contain the same background image but with a different position. The background image for each item will be animated to slide into place in different times, creating a really nice effect. The background image sliding direction from the list item in the middle will depend on which item the user was before: coming from the right, it will slide from the left and vice versa.

Animated Navigation with CSS & jQuery

15 Really Amazing jQuery Navigation Menu
by Soh Tanaka
As I was checking out some flash sites for inspiration, I ran across a couple websites that had some nice navigation effects. I’m not a huge fan of wildly animated navs, but these had simple and elegant roll over effects that I liked. I decided to imitate the effect with CSS and jQuery, and would like to share this technique today.

A Fresh Bottom Slide Out Menu with jQuery

15 Really Amazing jQuery Navigation Menu

by Mary Lou
In this tutorial we will create a unique bottom slide out menu. This large menu will contain some title and a description of the menu item. It will slide out from the bottom revealing the description text and some icon. We will use some CSS3 properties for some nice shadow effects and jQuery for the interaction.

How to Make a Smooth Animated Menu with jQuery

15 Really Amazing jQuery Navigation Menu
by Zach Dunn
Ever seen some excellent jQuery navigation that left you wanting to make one of your own? Today we’ll aim to do just that by building a menu and animate it with some smooth effects.

Overlay Effect Menu with jQuery

15 Really Amazing jQuery Navigation Menu
by Mary Lou
In this tutorial we are going to create a simple menu that will stand out once we hover over it by covering everything except the menu with a dark overlay. The menu will stay white and a submenu area will expand. We will create this effect using jQuery.

CSS Dock Menu

15 Really Amazing jQuery Navigation Menu
by Nick La
If you are a big Mac fan, you will love this CSS dock menu. It is using Jquery library and Fisheye component from Interface and some of my icons. It comes with two dock position: top and bottom.

Little Boxes Menu with jQuery

15 Really Amazing jQuery Navigation Menu
by Mary Lou
Today we will create a menu out of little boxes that animate randomly when a menu item is clicked. The clicked menu item expands and reveals a content area for some description or links. When the item is clicked again, the boxes will come back, reconstructing the initial background image.

Premium jQuery Scripts for Cute Menu Navigation

SV Animated Menu Pack 2

15 Really Amazing jQuery Navigation Menu
by SplitV
This is a set of 4 animated menu scripts. All are stand alone, requiring no external libraries or frameworks. They are extremely small at 1-2kb a piece uncompressed. If you compress them they are all closer to 1-1.5kb. These scripts make it possible to create great menus with flash like effects very easily.

Nice Menu V1.0

15 Really Amazing jQuery Navigation Menu
by Alexandra1710
A new way to slide between 2 level huge menu.
easy to use, valid html and css code
works in all majors browsers
easy to plug and play script to your website / blog or gallery

Super menu pack (10 menus)

15 Really Amazing jQuery Navigation Menu
by VanKarWai
Super menu pack is a collection of 10 cool menus, 5 in pure css and 5 using jQuery framework for customize or layout with your websites or applications and projects.
It’s perfect for anyone who wants to give a special touch to their designs or find a starting point. I tried to create a collection as varied as possible in style and appearance to give you choice. Thinking in design working with code.

Cute Menu – 8 transitions pack

15 Really Amazing jQuery Navigation Menu
by arl1nd
Cute Menu is very simple to embed to your HTML code. It’s requirements are only JavaScript and CSS support.


Tooltip

http://www.freshdesignweb.com/jquery-mouseover.html


Easiest Mouseover Image Preview Using jQuery

It is a rollover image preview. You know, one of those tooltip-like bubble popups that appears when you roll over link or a thumbnail.

23 Mouseover Image Preview Using jQuery Demo | Download


Can show tooltip with image, good from demo student's screen to teacher.


Build a Better Tooltip On Mouseover with jQuery

In this tutorial I’m going to show you how to quickly write a jQuery plugin that will replace the typical browser tooltip with something a little flashier.

24 Tooltip On Mouseover with jQuery Demo | Download


Pretty Lightweight Roll Over Tooltips Plugin

It is a very lightweight jQuery plugin that gives the ability to add tooltips to pretty much any element on a page. Thoroughly documented and designer friendly.

30 Pretty Lightweight Roll Over Tooltips Plugin Demo | Download


Pretty Hover Effects with CSS and jQuery

This article will show you how to create pretty hover effects for your images using jQuery and CSS. This can come useful especially if you already have hundreds of images that you want to apply this effect on.

jquery mouseover 011 Demo | Download


jQuery image slide on hover effect

This is a simple technique to animate an image when hovering using jQuery animate() effect. We will use this effect to manipulate our CSS, creating a seamless transition between two areas of an image.

jquery mouseover 08 Demo

Realistic Hover Effect With jQuery

Using jQuery’s animate effect, I experimented with icons that have reflections and others with shadows. Here is a demo with two examples:

jquery mouseover 14 Demo | Download

Hover fading transition with jQuery

jquery mouseover 11 Demo