http://developer.android.com/tools/samples/index.html
Samples
To help you understand some fundamental Android APIs and coding practices, a variety of sample
code is available from the Android SDK Manager. Each version of the Android platform available
from the SDK Manager offers its own set of sample apps.
To download the samples:
- Launch the Android SDK Manager.
- On Windows, double-click the SDK Manager.exe file at the root of the Android SDK
directory.
- On Mac or Linux, open a terminal to the
tools/ directory in the
Android SDK, then execute android sdk.
- Expand the list of packages for the latest Android platform.
- Select and download Samples for SDK.
When the download is complete, you can find the source code for all samples at this location:
<sdk>/samples/android-<version>/
The
<version> number corresponds to the platform's
API level.
You can easily create new Android projects with the downloaded samples, modify them
if you'd like, and then run them on an emulator or device.
I have developed a application in android that I wanna sync
data (such as db record, media) between it and a server. If you've seen
Evernote or similar Applications, you certainly understand my mean.
I have some question(imagine we want to sync DB records):
- Every user has a part of server space for himself(such as
Evernote or Dropbox). Maybe user create new records by cellphone and create new records in server or anyway. How can I match these records together? If there are records with sane ID What algorithms do you suggest me?
- Except JSON, Are there any way for send data between cellphone device and server?
- If SyncAdapter and ContentProvider can solve my
problems, please explain exactly for me. (If you could offer some
samples or tutorials to me OR Any advice or keywords to help
broaden/guide my search would be appreciated as well).
I'll try to answer all your questions by addressing the larger question:
How can I sync data between a webserver and an android app?
Syncing data between your webserver and an android app requires a couple of different components on your android device.
Persistent Storage:
This is how your phone actually stores the data it receives from the
webserver. One possible method for accomplishing this is writing your
own custom
ContentProvider backed by a Sqlite database. A decent tutorial for a content provider can be found here:
http://thinkandroid.wordpress.com/2010/01/13/writing-your-own-contentprovider/
A
ContentProvider defines a consistent interface to interact
with your stored data. It could also allow other applications to
interact with your data if you wanted. Behind your
ContentProvider could be a Sqlite database, a Cache, or any arbitrary storage mechanism.
While I would certainly recommend using a
ContentProvider with a Sqlite database you could certainly use any java based storage mechanism you wanted.
Data Interchange Format:
This is the format you use to send the data between your webserver
and your android app. The two most popular formats these days are XML
and JSON. When choosing your format, you should think about what sort of
serialization libraries are available. I know off-hand that there's a
fantastic library for json serialization called gson:
http://code.google.com/p/google-gson/, although I'm sure similar libraries exist for XML.
Synchronization Service
You'll want some sort of asynchronous task which can get new data
from your server and refresh the mobile content to reflect the content
of the server. You'll also want to notify the server whenever you make
local changes to content and want to reflect those changes. Android
provides the
SyncAdapter pattern as a way to easily solve this
pattern. You'll need to register user accounts, and then Android will
perform lots of magic for you, and allow you to automatically sync.
Here's a good tutorial:
http://www.c99.org/2010/01/23/writing-an-android-sync-provider-part-1/
As for how you identify if the records are the same, typically you'll
create items with a unique id which you store both on the android
device and the server. You can use that to make sure you're referring to
the same reference. Furthermore, you can store column attributes like
"updated_at" to make sure that you're always getting the freshest data,
or you don't accidentally write over newly written data.
Hope this helps.
Writing an Android Sync Provider: Part 1
One of the highlights of the Android 2.0 SDK is that you can write
custom sync providers to integrate with the system contacts, calendars,
etc. The only problem is that there’s very little documentation on how
it all fits together. And worse, if you mess up in certain places, the
Android system will crash and reboot! Always up for a challenge, I’ve
navigated through the sparse documentation, vague mailing list posts,
and the Android source code itself to build a sync provider for our
Last.fm app. Want to know how to build your own? Read on!
Account Authenticators
The first piece of the puzzle is called an
Account Authenticator,
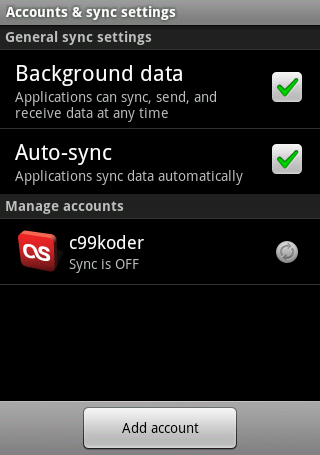
which defines how the user’s account will appear in the “Accounts &
Sync” settings. Implementing an Account Authenticator requires 3
pieces: a service that returns a subclass of
AbstractAccountAuthenticator from the onBind method, an activity to
prompt the user to enter their credentials, and an xml file describing
how your account should look when displayed to the user. You’ll also
need to add the
android.permission.AUTHENTICATE_ACCOUNTS permission to your AndroidManifest.xml.
The Service
The authenticator service is expected to return a subclass of
AbstractAccountAuthenticator from the onBind method — if you don’t,
Android will crash and reboot when you try to add a new account to the
system. The only method in AbstractAccountAuthenticator we really need
to implement is addAccount, which returns an Intent that the system will
use to display the login dialog to the user. The implementation below
will launch our app’s main launcher activity with an action of
“fm.last.android.sync.LOGIN” and an extra containing the
AccountAuthenticatorResponse object we use to pass data back to the
system after the user has logged in.
AccountAuthenticatorService.java
-
import fm.last.android.LastFm;
-
import android.accounts.AbstractAccountAuthenticator;
-
import android.accounts.Account;
-
import android.accounts.AccountAuthenticatorResponse;
-
import android.accounts.AccountManager;
-
import android.accounts.NetworkErrorException;
-
import android.app.Service;
-
import android.content.Context;
-
import android.content.Intent;
-
import android.os.Bundle;
-
import android.os.IBinder;
-
import android.util.Log;
-
-
/**
-
* Authenticator service that returns a subclass of AbstractAccountAuthenticator in onBind()
-
*/
-
public class AccountAuthenticatorService extends Service {
-
private static final String TAG = "AccountAuthenticatorService";
-
private static AccountAuthenticatorImpl sAccountAuthenticator = null;
-
-
public AccountAuthenticatorService() {
-
super();
-
}
-
-
public IBinder onBind(Intent intent) {
-
IBinder ret = null;
-
if (intent.getAction().equals(android.accounts.AccountManager.ACTION_AUTHENTICATOR_INTENT))
-
ret = getAuthenticator().getIBinder();
-
return ret;
-
}
-
-
private AccountAuthenticatorImpl getAuthenticator() {
-
if (sAccountAuthenticator == null)
-
sAccountAuthenticator = new AccountAuthenticatorImpl(this);
-
return sAccountAuthenticator;
-
}
-
-
private static class AccountAuthenticatorImpl extends AbstractAccountAuthenticator {
-
private Context mContext;
-
-
public AccountAuthenticatorImpl(Context context) {
-
super(context);
-
mContext = context;
-
}
-
-
/*
-
* The user has requested to
add a new account to the system. We return an intent that will launch
our login screen if the user has not logged in yet,
-
* otherwise our activity will just pass the user's credentials on to the account manager.
-
*/
-
@Override
-
public Bundle addAccount(AccountAuthenticatorResponse response, String accountType, String authTokenType, String[] requiredFeatures, Bundle options)
-
throws NetworkErrorException {
-
Bundle reply = new Bundle();
-
-
Intent i = new Intent(mContext, LastFm.class);
-
i.setAction("fm.last.android.sync.LOGIN");
-
i.putExtra(AccountManager.KEY_ACCOUNT_AUTHENTICATOR_RESPONSE, response);
-
reply.putParcelable(AccountManager.KEY_INTENT, i);
-
-
return reply;
-
}
-
-
@Override
-
public Bundle confirmCredentials(AccountAuthenticatorResponse response, Account account, Bundle options) {
-
return null;
-
}
-
-
@Override
-
public Bundle editProperties(AccountAuthenticatorResponse response, String accountType) {
-
return null;
-
}
-
-
@Override
-
public Bundle getAuthToken(AccountAuthenticatorResponse response, Account account, String authTokenType, Bundle options) throws NetworkErrorException {
-
return null;
-
}
-
-
@Override
-
public String getAuthTokenLabel(String authTokenType) {
-
return null;
-
}
-
-
@Override
-
public Bundle hasFeatures(AccountAuthenticatorResponse response, Account account, String[] features) throws NetworkErrorException {
-
return null;
-
}
-
-
@Override
-
public Bundle updateCredentials(AccountAuthenticatorResponse response, Account account, String authTokenType, Bundle options) {
-
return null;
-
}
-
}
-
}
The account authenticator service should be defined in your
AndroidManifest.xml, with a meta-data tag referencing an xml definition
file, as follows:
Snippet from AndroidManifest.xml
-
<service android:name="AccountAuthenticatorService"
-
android:exported="true" android:process=":auth">
-
<intent-filter>
-
<action android:name="android.accounts.AccountAuthenticator" />
-
</intent-filter>
-
<meta-data android:name="android.accounts.AccountAuthenticator"
-
android:resource="@xml/authenticator" />
-
</service>
The Activity
If you don’t already have a login screen, there’s a convenience class
AccountAuthenticatorActivity
you can subclass that will pass your response back to the
authentication manager for you, however if you already have a login
activity in place you may find it easier to just pass the data back
yourself, as I have done here. When the user has successfully been
authenticated, we create an Account object for the user’s credentials.
An account has an account name, such as the username or email address,
and an account type, which you will define in your xml file next. You
may find it easier to store your account type in strings.xml and use
getString() to fetch it, as it is used in multiple places.
Snippet from the Last.fm login activity
-
Account account = new Account(username, getString(R.string.ACCOUNT_TYPE)));
-
AccountManager am = AccountManager.get(this);
-
boolean accountCreated = am.addAccountExplicitly(account, password, null);
-
-
Bundle extras = getIntent.getExtras();
-
if (extras != null) {
-
if (accountCreated) { //Pass the new account back to the account manager
-
AccountAuthenticatorResponse response = extras.getParcelable(AccountManager.KEY_ACCOUNT_AUTHENTICATOR_RESPONSE);
-
Bundle result = new Bundle();
-
result.putString(AccountManager.KEY_ACCOUNT_NAME, username);
-
result.putString(AccountManager.KEY_ACCOUNT_TYPE, getString(R.string.ACCOUNT_TYPE));
-
response.onResult(result);
-
}
-
finish();
-
}
The XML definition file
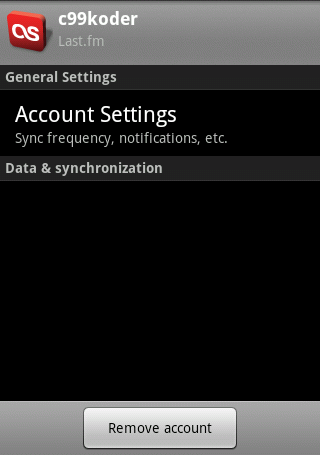
The account xml file defines what the user will see when they’re
interacting with your account. It contains a user-readable name, the
system account type you’re defining, various icons, and a reference to
an xml file containing PreferenceScreens the user will see when
modifying your account.
authenticator.xml
-
<account-authenticator xmlns:android="http://schemas.android.com/apk/res/android"
-
android:accountType="fm.last.android.account"
-
android:icon="@drawable/icon"
-
android:smallIcon="@drawable/icon"
-
android:label="@string/app_name"
-
android:accountPreferences="@xml/account_preferences"/>
account_preferences.xml
-
<PreferenceScreen
-
xmlns:android="http://schemas.android.com/apk/res/android">
-
<PreferenceCategory
-
android:title="General Settings" />
-
-
<PreferenceScreen
-
android:key="account_settings"
-
android:title="Account Settings"
-
android:summary="Sync frequency, notifications, etc.">
-
<intent
-
android:action="fm.last.android.activity.Preferences.ACCOUNT_SETUP"
-
android:targetPackage="fm.last.android"
-
android:targetClass="fm.last.android.activity.Preferences" />
-
</PreferenceScreen>
-
</PreferenceScreen>
Putting it all together
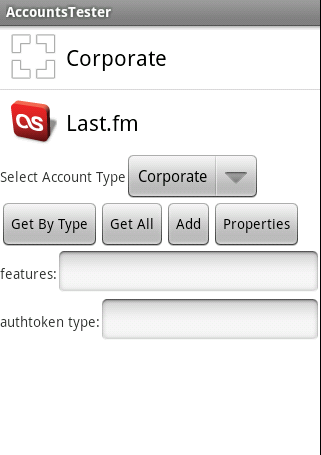
Now we’re ready for testing! The Android accounts setting screen
doesn’t handle exceptions very well — if something goes wrong, your
device will reboot! A better way to test is to launch the emulator, run
the “Dev Tools” app, and pick “AccountsTester”.
You should see your new account type in the list, along with the
built-in “Corporate” account type. Go ahead and select your account
type from the drop-down list, and then press the “Add” button, and you
should be presented with your login activity. After authenticating,
your account should appear in a list below the buttons. At this point,
it should be safe to use the system “Accounts & Sync” settings
screen to remove or modify your account.
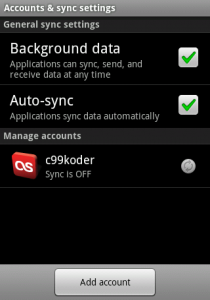
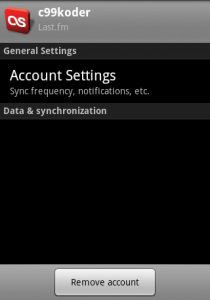
Ready to fill in that section below “Data & synchronization”? Let’s move on to
part 2!
The source code for the implementation referenced here is available in my
Last.fm github project under the terms of the GNU General Public License. A standalone sample project is also available
here under the terms of the Apache License 2.0. Google has also released their own sample sync provider on the
Android developer portal that’s a bit more complete than mine.